Free shipping on orders of $35 or more
0 Cart
Added to Cart
    You have items in your cart
    You have 1 item in your cart
    Total
    Check Out Continue Shopping
    Cookies! Chinese New Year Traditions

    Cookies! Chinese New Year Traditions

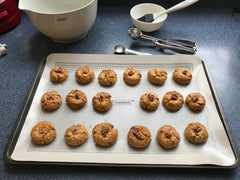
    Just when you thought cookie season was over, I would like to introduce you to two traditional Chinese New Year Cookie recipes Hup Toh So and Almond Cookies.  

    Almond Cookies are created using traditional wooden molds, last year I demonstrated using husMait round cookie cutters and the bottom of husMait measuring cups. See that post here. The base of the 1/3 cup Stainless Steel Measuring Cup fits perfectly into the second smallest Stainless Steel Cookie Cutters and the 1/8 Stainless Steel Cup can be used in the smallest Stainless Steel Cookie Cutter.


    This year I was able to go to Shanghai Street, in Hong Kong to buy the traditional wooden molds, and I am returning to Helen Au’s A Step Full of You for her Vegan Chinese Almond Cake Biscuit recipe. I love the way the traditional molds shaped the cookies.


    Hup Toh So is a walnut cookie this year I am using a recipe from Daily Cooking Quest by Anita. If you are looking for a vegan version, I like this one from What To Cook Today, or simply replace the butter with vegan butter or vegetable shortening.


    Products used in baking these recipes: 

    Set of 3 Melamine Mixing Bowls
    Stainless Steel Cookie Cutters
    Stainless Steel Measuring Cups
    Stainless Steel Measuring Spoons
    Flour Scraper Set of 2
    Essential Bakeware 5 Piece Set
    Signature Bakeware 5 Piece Set

    Thanksgiving Gravy Two Ways

    Thanksgiving Gravy Two Ways

    Thanksgiving is just a few short weeks away, and the husMait kitchen has been testing some vegan recipes. One of our favorites was Vegan, Gluten-Free Stuffing-Muffins with Mashed Potatoes and Gravy from Ilene Godofsky Moreno. Ilene made a miso gravy to go on top of hers, but I wanted a gravy that was closer to our pre-vegan turkey gravy. 

    Let's talk Gravy 101 first. Everything I know about gravy and sauces I learned from the Fannie Farmer Cookbook, by Marion Cunningham. Gravy and its sister Bechamel Sauce have some fundamentals that are easy to master. Begin with equal parts fat to flour, and cook this roux over medium heat, whisking constantly, for a minimum of 3 minutes and up to 15 minutes. Roux cooked for 3 minutes will lose its raw flour flavor, and will produce a pale gravy. The longer you cook the roux, the deeper the color becomes, and the more flavor develops. However, watch the roux carefully as it will burn. To the roux whisk in stock, milk, or cream. 

    Our first gravy is Fannie Farmer Basic Chicken or Turkey Gravy. The recipe calls for a ratio of 4 Tablespoons of pan dripping fat + 3 Tablespoons of flour + 2 cups of pan drippings liquid and stock which produces 2 cups of gravy. It was in this cookbook where I learned a foolproof way to have smooth gravy is to whisk in warm or hot liquid to the roux.

    With that knowledge let's talk about our second way - Vegan Onion Gravy. We want a rich, savory, brown gravy to go with our Stuffing Muffins. 

    Method: I started with thinly sliced onion, sautéed in 1 tablespoon of canola oil and a pinch of salt until it was just on the verge of caramelization. I knew I needed to cook the onions for a minimum of three more minutes so they would further caramelize during that time, and I did not want them to burn. Then I added Miyokos European Style Cultured Vegan Butter and all-purpose flour and let the roux cook for at least 3 minutes, but probably closer to 6 minutes until it was a lovely rich brown. Then I added 1 cup of warm Better than Boullion Seasoned Vegetable Base and seasonings. I continuously whisked this until the gravy thickened and became a rich golden brown. 

    Ingredients 

    • 1 small onion, sliced thin 
    • 1 tablespoon canola oil
    • 2 tablespoons Vegan Butter
    • 2 tablespoons flour you can sub 1-1 gluten-free flour
    • 1 to 1 1/2 cup vegetable broth
    • 1 sprig of fresh thyme 
    • black pepper
    • salt (taste before adding additional salt at the last step)
    Equipment 

    You could omit the onions and use another vegetable, such as mushrooms or carrots or celery to be browned at the start, to create a Jane version of this gravy.

    Finally a note on quantity this was more than enough for the Stuffing Muffin recipe above. You can certainly scale this recipe up or down depending on how many people you will be serving. A general rule of thumb is 1/4 to 1/2 cup of gravy per person. 

    Find a video tutorial and more images over on Instagram.

    As always thank you for stopping by and let me know if you try our recipes in the comments below and or by tagging us on Instagram.

    Sending warm wishes to your home, 
    from the husMait home kitchen. 

    Chocolate Mint Wafers - Gluten-free & Vegan Version

    Chocolate Mint Wafers - Gluten-free & Vegan Version

    Today I am adapting a traditional recipe from the Better Homes and Garden Cookbook, circa 1950, which I inherited from my mother-in-law. Many traditional recipes are adapted to become gluten-free & vegan easily.  

    A few things I look for when considering a recipe: Is there a 'rise' that will be affected? Is there a textural element that will be affected? Sometimes I can compensate for these changes by increasing raising agents such as baking powder, cream of tartar, or substituting aquafaba whip for egg whites. Also being aware of how each raising agent works is important, it may need to be added later, or mixed minimally. For texture, it may be adapted by adding a glutenous grain such as rice flour, xantham gum, or oat flour or molding pastry crusts rather than rolling them. 

    I have learned a few things from my recent experiences adapting traditional recipes. One is that vegan butter has a much lower melting temperature than butter. Vegan butter is almost liquid at room temperature, therefore, chilling the dough is a great solution for a too soft dough. The gluten-free dough also benefits from resting either in the refrigerator or at room temperature. The flax egg is a great substitute, so long as you do not mind the look of the flax meal in your bake.  

    This is my updated Gluten-free Vegan Chocolate - Mint Wafer recipe.

    Chocolate Wafer Ingredients 
    2/3 cups (5.3 oz) Vegan Butter
    1 cup sugar
    1 flax egg ***
    2 cups 1-1 Gluten-Free Flour 
    3/4 cup Cocoa Powder
    1 teaspoons baking powder
    1/2 teaspoon salt
    1 teaspoon baking soda
    1/4 cup soy or almond milk

    Mint Filling Ingredients
    1 cup sifted confectioner's sugar
    1/8 teaspoon peppermint extract
    1/2 cup Crisco shortening 
    Crushed candy canes

    Equipment 
    Stainless Steel Measuring Cups 
    Stainless Steel Measuring Spoons 
    Melamine Mixing Bowls or Stainless Steel Mixing Bowls 
    12" Silicone Whisk with Stainless Steel Handle
    OR 10” Silicone Whisk with Wooden Handle
    Silicone Rolling Pin
    Silicone Rolling Mat
    Silicone Flour Scraper
    Silicone Baking Mat
    10"x15" Non-Stick Baking Sheet

    Cooling rack  

    Method: 
    1) In a medium bowl measure and whisk thoroughly gluten-free flour, cocoa powder, baking powder, salt, and baking soda.

    2) In a large bowl cream the vegan butter and sugar. When fully creamed add the flax egg. Whip until light and fluffy. 

    3) Alternately add dry ingredients and vegan milk. Mixing well and scraping the bowl between additions. 

    4) Divide the dough into 4 and chill thoroughly. 

    Preheat oven to 350F

    5) Remove a quarter of the dough and roll to 1/8".  Cut into shapes. Repeat with the other quarters. Refrigerate the scraps that become too soft between rolling. 

    6) Bake for 8 - 10 minutes. Cool 

    7) Make the filling by beating together confectioners sugar, peppermint extract, and Crisco until spreading consistency.

    8) Spread a thin layer of frosting onto the bottom of a cookie, and top with another, finally roll in crushed candy canes. 

    Note:
     Double the filling ingredients if you like a lot of filling!
    ***1 Tablespoon flax meal + 3 Tablespoons warm water, stir and let stand 5 minutes

    If you would like more information on this recipe there is a process tutorial and more still photos of these cookies over on our Instagram page husMait_home 

    We would love to hear from you in the comments below if you try this or any of our recipes  

    Sending warm wishes to your home, 
    from the husMait home kitchen. 

    Sheri’s Granola Recipe

    Sheri’s Granola Recipe

    Homemade granola is simply nutritious and delicious. We appreciate that we control the sugar content. I use Quaker Oats because they are nut free and gluten free. If your family is nut free simply increase the variety and amount of seeds you add to the recipe. Example 1 cup of each seed, or add flax, hemp or sesame to the mix. 

    Our family likes homemade granola on plain yogurt with a spoon of homemade jam. Granola is also delicious with milk - almond or soy milks are great choices. We also like to add a handful of dried fruit for extra sweetness.

    Ingredients 
    5 cups of thick-cut rolled oats
    2 Tablespoons packed brown sugar
    ½ teaspoon ground cinnamon
    ¼ teaspoon kosher salt

    1/3 cup honey
    ¼ cup canola oil
    1 teaspoon vanilla extract

    ¾ cup pecans (you can used chopped nuts)
    ¾ cup almonds
    ½ cup pumpkin seeds
    ½ cup sunflower seeds

    Equipment
    Set of 3 Stainless Steel Bowls
    Stainless Steel Measuring Cups
    Stainless Steel Measuring Spoons
    Set of 2 Flour Scraper  
    10.5 x 15 nonstick baking pan
    Chopping board

    7” Santoku Knife with Sheath

    Method 

    Preheat oven to 300 F placing the rack in the middle, if possible add a second rack below. 

    Place the oats, brown sugar, cinnamon, and salt in a large bowl and mix well making sure to blend out any brown sugar lumps. 

    In a separate bowl mix the honey, canola oil, and vanilla extract well.

    Pour this over the oat mixture and stir well until the oats are thoroughly coated.
    Spread the mixture in an even layer on a rimmed baking sheet. See note

    Bake for 15 minutes, then stir and continue baking until the granola is very light golden brown; stirring every 5 minutes for about 15 to 20 minutes more.

    AT THE SAME TIME AS YOU BAKE THE GRANOLA
    Spread the pecans and almonds on a second baking sheet and place that on the lower rack in the oven for 10 minutes. Cool slightly and transfer to a cutting board.

    Put the pumpkin and sunflower seeds on the baking sheet and bake for 10 minutes.

    When the nuts are cool cut them into small pieces.

    When nicely browned remove the granola pan from the oven and mix the nuts and seeds into the baked oats.

    Cool completely and store in an airtight container.

    Notes
    After trying many baking trays I found a 10.5 x 15 nonstick baking pan is the best. The high sides help keep the oats contained while frequently stirring.

    Let us know in the comments if you try our recipe. 

    Sending warm wishes to your home, 
    from the husMait home kitchen. 

    Double Crust Pie Recipe

    Double Crust Pie Recipe


    Today I am sharing the pie crust recipe that I have been using for over 40 years. I am including some Baking 101 tips I learned in my high school home economics class. You can find my video tutorial over on our Instagram IGTV.


    One Double-Crust Pie Shell
    Ingredients
    2 2/3 cups all-purpose flour
    1 teaspoon salt
    1 cup of solid shortening 
    6 Tablespoons cold water 

    Equipment 
    Measuring Cups
    Measuring Spoons
    Silicone Rolling Mat
    Silicone Rolling Pin
    Set of 2 Flour Scraper
    Essentials Bakeware 5 Piece Set
    Melamine Mixing Bowls                                                                                                                                                                                                                                                                                                                                                                                                                                                                                           

    Method:
    1) Add the sifted flour and salt into a large mixing bowl. Stir together.

    Note: It is important to sift flour before you measure it. The flour inside the bag will have become dense during transport and handling. Then lightly fill the cup, being careful not to pack the flour. Finally, use a knife to level off the cup. 

    2) Add the shortening and cut it into the flour. 

    Note: There are three ways of incorporating the flour using two knives, or a pastry blender, or rub it in with your fingers. If you decide to use your fingers it is important not to overwork the dough or let the mixture get too warm. 

    Note: When measuring shortening, press it firmly into the cup, pushing out any air bubbles that will affect the measurement.  

    Note: When using knives or the pastry blender the mixture will look like small peas. If rubbing the mixture will look like coarse sand. 

    3) Add the water, one tablespoon at a time. Gently mix with a fork or silicon flour scraper between each additional tablespoon of water. Note: Do not overwork the dough. 

    4) Bring the dough gently together using your hands and place it on the husMait silicone rolling mat. And form a ball and divide it into two. 

    5) Roll the crust into a circle. Dust the surface of the rolling mat lightly with flour and roll into a circle to fit the size of your pie plate. The husMait Silicone Rolling mat has easy to read design that includes measurements for dough sizes. These graduated circles take the guess work out of what size to roll the dough. 

    Note: Flatten the 1/2 dome into a disc, pinching any obvious cracks together. You can continue gently repairing cracks that begin at the edges by gently pinching it together as you roll. 

    Note: Lightly flour underneath the crust occasionally to allow the dough to move as it enlarges. 

    It is my hope that the tips and tricks I share here will help you become a more confident and successful home baker.  So that you will be able to share your love in real and tangible ways. 

    Sending warm wishes to your home, 
    from the husMait home kitchen. 

    4th of July Baked Beans

    4th of July Baked Beans

    American Flags, parades, fireworks, picnics, families, friends, and nostalgia - these are some of the memories that I have of the Independence Day 4th of July.

    Family picnics were integral events in my family. I recall elaborate events on my grandparent's lawn, surrounded by a meticulously pruned hedge, the backyard had lawn chairs and tables laden with perfect cool finger foods. Radish roses, curled carrots, and celery sticks cold from the refrigerator. In other years picnics were hosted at my Aunt and Uncle's, and there we were allowed to have sparklers, and the older children lit firecrackers. And I recall many, many years when picnics were hosted at my parent's home. Happy memories of helping my mom make macaroni and potato salad, and watching my mother make her famous baked beans.

    My mother had that knack of cooking without a recipe so when we wanted to recreate these awesome baked beans she was tasked with writing it out. Mom always made these in the cool of the morning, and then they would cook and keep warm for the rest of the day, so cooking times are hard to pin down. Mom always cooked a crockpot full, that contained 7 pounds of baked beans + 2 pounds of bacon, they were delicious, and leftovers never lasted long.

    A few important notes - always fry and drain the bacon, and always cook the onions. I have made these with Bush’s Baked Beans - any variety should work. These two companies beans are gluten free.  

    I have cut Mom’s recipe in half, but feel free to scale back up. 

    5 Quart pot with lid or crock pot
    4 cans -28 oz B&M Original Baked Beans 
    5-6 large onions, sliced and sautéd 
    1lb bacon, cooked, drained, and diced
    5 tablespoons ketchup
    5 tablespoon brown sugar
    3 teaspoons dry mustard

    Oven method: Add all the prepared ingredients to the 5 quart pot, baked in an oven at 350F until bubbly. Then bake for an hour stirring occasionally. Reduce oven heat and keep warm. 

    Crock Pot method: Add all the ingredients to crock pot, cook on high for 1-2 hours then keep warm. 

    Either way the beans should be cooked until thick and bubbly. 


    We wish you a festive 4th of July! 

    With warm wishes for your home,
    from the husMait home kitchen.

    Supplies list:
    fry pan
    5 quart pot
    Stainless Steel Measuring Spoons
    Stainless Steel Knives