Free shipping on orders of $35 or more
0 Cart
Added to Cart
    You have items in your cart
    You have 1 item in your cart
    Total
    Check Out Continue Shopping

    Articles and Recipes — Melamine Mixing Bowls

    Cookies! Chinese New Year Traditions

    Cookies! Chinese New Year Traditions

    Just when you thought cookie season was over, I would like to introduce you to two traditional Chinese New Year Cookie recipes Hup Toh So and Almond Cookies.  

    Almond Cookies are created using traditional wooden molds, last year I demonstrated using husMait round cookie cutters and the bottom of husMait measuring cups. See that post here. The base of the 1/3 cup Stainless Steel Measuring Cup fits perfectly into the second smallest Stainless Steel Cookie Cutters and the 1/8 Stainless Steel Cup can be used in the smallest Stainless Steel Cookie Cutter.


    This year I was able to go to Shanghai Street, in Hong Kong to buy the traditional wooden molds, and I am returning to Helen Au’s A Step Full of You for her Vegan Chinese Almond Cake Biscuit recipe. I love the way the traditional molds shaped the cookies.


    Hup Toh So is a walnut cookie this year I am using a recipe from Daily Cooking Quest by Anita. If you are looking for a vegan version, I like this one from What To Cook Today, or simply replace the butter with vegan butter or vegetable shortening.


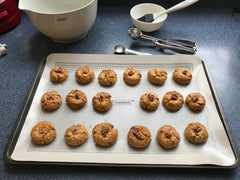
    Products used in baking these recipes: 

    Set of 3 Melamine Mixing Bowls
    Stainless Steel Cookie Cutters
    Stainless Steel Measuring Cups
    Stainless Steel Measuring Spoons
    Flour Scraper Set of 2
    Essential Bakeware 5 Piece Set
    Signature Bakeware 5 Piece Set

    Basic Balsamic Vinaigrette

    Basic Balsamic Vinaigrette

    Today I am sharing our favorite Balsamic Vinaigrette, which is my recipe adapted over the years. 

    This vinaigrette was based on a pasta salad dressing my mom used to make. You can make this in a mortar and pestle, or a blender, or on a chopping board. Check out our Instagram IGTV for a visual tutorial.

    I often make this on the cutting board since it is probably on the counter for a salad anyway. 

    Ingredients:
    1 clove of Garlic, peeled 
    1 handful of fresh Basil (1/8 to 1/4 cup)
    1 Tablespoon fresh Oregano 
    1 Tablespoon Capers 
    1/3 cup Balsamic Vinegar 
    1/3 cup water
    1 - 2 Teaspoons Dijon Mustard
    1/3 cup Olive Oil
    Pinch Salt
    1/2 teaspoon Pepper


    Equipment:
    Cutting Board
    Set of 3 Melamine Mixing Bowl
    12” Silicone Whisk With Stainless Steel Handle
    Side Tang Cooks Knife
    Stainless Steel Measuring Spoons
    Stainless Steel Measuring Cups

    Method: 

    1. Roughly mince the garlic on the cutting board
    2. Add 1/4-1/2 teaspoon of salt on top of the garlic. Using the flat of the knife crush and rub the garlic and salt into a paste. Place the paste into the mixing bowl.
    3. Chiffonade the basil and oregano together. Add the capers to them and chop these finely. Place them into the mixing bowl.
    4. To the mixing bowl add the vinegar, water, mustard, a pinch of salt, and pepper. Whisk well. 
    5. Add the oil and whisk very well, until the oil is fully emulsified. 
    6. Taste and adjust the seasonings - be mindful that you do not over-salt the dressing - you added salt with the garlic, the capers, and the mustard have salt, and you may be adding salty items to your salad like olives, feta cheese, or salami.
    7. Keep the dressing refrigerated in a jar. I use a 1/2 Pint Canning Jar with a leakproof lid.

    We hope you try our recipe. Let us know what you think in the comments. 


    Sending warm wishes to your home, 

    from the husMait home kitchen. 

    Double Crust Pie Recipe

    Double Crust Pie Recipe


    Today I am sharing the pie crust recipe that I have been using for over 40 years. I am including some Baking 101 tips I learned in my high school home economics class. You can find my video tutorial over on our Instagram IGTV.


    One Double-Crust Pie Shell
    Ingredients
    2 2/3 cups all-purpose flour
    1 teaspoon salt
    1 cup of solid shortening 
    6 Tablespoons cold water 

    Equipment 
    Measuring Cups
    Measuring Spoons
    Silicone Rolling Mat
    Silicone Rolling Pin
    Set of 2 Flour Scraper
    Essentials Bakeware 5 Piece Set
    Melamine Mixing Bowls                                                                                                                                                                                                                                                                                                                                                                                                                                                                                           

    Method:
    1) Add the sifted flour and salt into a large mixing bowl. Stir together.

    Note: It is important to sift flour before you measure it. The flour inside the bag will have become dense during transport and handling. Then lightly fill the cup, being careful not to pack the flour. Finally, use a knife to level off the cup. 

    2) Add the shortening and cut it into the flour. 

    Note: There are three ways of incorporating the flour using two knives, or a pastry blender, or rub it in with your fingers. If you decide to use your fingers it is important not to overwork the dough or let the mixture get too warm. 

    Note: When measuring shortening, press it firmly into the cup, pushing out any air bubbles that will affect the measurement.  

    Note: When using knives or the pastry blender the mixture will look like small peas. If rubbing the mixture will look like coarse sand. 

    3) Add the water, one tablespoon at a time. Gently mix with a fork or silicon flour scraper between each additional tablespoon of water. Note: Do not overwork the dough. 

    4) Bring the dough gently together using your hands and place it on the husMait silicone rolling mat. And form a ball and divide it into two. 

    5) Roll the crust into a circle. Dust the surface of the rolling mat lightly with flour and roll into a circle to fit the size of your pie plate. The husMait Silicone Rolling mat has easy to read design that includes measurements for dough sizes. These graduated circles take the guess work out of what size to roll the dough. 

    Note: Flatten the 1/2 dome into a disc, pinching any obvious cracks together. You can continue gently repairing cracks that begin at the edges by gently pinching it together as you roll. 

    Note: Lightly flour underneath the crust occasionally to allow the dough to move as it enlarges. 

    It is my hope that the tips and tricks I share here will help you become a more confident and successful home baker.  So that you will be able to share your love in real and tangible ways. 

    Sending warm wishes to your home, 
    from the husMait home kitchen. 

    Strawberry Rhubarb Crumble

    Strawberry Rhubarb Crumble

    It’s rhubarb season, which lasts from April to July in most places. The warmer the climate the shorter the season.

    My memories of rhubarb go back to spring and my teenage years when I picked rhubarb from the back garden, where I recall it growing all summer long. Rhubarb pie is one of the first pies I learned to bake and was my dad’s favorite. 

    Fast forward to heart-healthy eating and fewer people at home to eat a pie and I need my rhubarb fix in a different way.  I was really pleased to find this recipe for Strawberry Rhubarb Crisp from  Once Upon a Chef.  I decided to try her recipe because of the simplicity of the ingredients and the added pecans and oats in the topping. 

    I was also very excited that this was a quick recipe to assemble and would be easy to transport to a picnic or beautifully elegant to serve at a dinner party. 

    I did make two changes - first I substituted gluten-free Namaste Perfect Flour Blend and second Miyoko’s European-style vegan butter. This recipe calls for a 2-quart baking dish, I used my 9.5 inch Pyrex pie dish which worked fantastically.

    The two-part method is easy. First, wash and cut your fruit. Then mix the fruit well with granulated sugar, cornstarch, and vanilla in a large bowl. Transfer this to the baking dish. 

    Second, create the topping by combining flour, brown sugar, granulated sugar, salt, and cold butter in a medium bowl using a pastry cutter. Then stir in the oats and chopped pecans. Spoon this mixture over the fruit. 

    The crumble smelled delicious as it baked and the topping came out crispy and browned with lovely bubbly fruit beneath.  We ate it simply as it was. Adding whipped cream or ice cream would have been heavenly! 

    Equipment used: Our Bowl Sets are currently on SALE June 2021

    Measuring spoons
    Measuring cups
    Bowls - Set of 3 Melamine Bowls or Set of 3 Stainless Steel Bowls
    7” Santoku knife
    Wire Cooling Rack
    Cutting Board
    Pastry Cutter


    Luscious Flourless Orange Cake

    Luscious Flourless Orange Cake


    Here in the husMait kitchen, we look for a great treat that will satisfy our sweet tooth and have some redeeming qualities. We found this recipe posted over on Instagram, and it looks so moist and delicious, not to mention the recipe had simple ingredients and was easy to follow. Baking Envy, Flourless Orange Cake 

    Assemble all of your utensils: knife, cutting board, pan, measuring cups, measuring spoons, mixing bowl, blender and 8 inch round cake tin.

    Assemble all of the ingredients: oranges, sugar, almond meal, eggs, vanilla essence, and baking powder.  Then follow the recipe linked above. 

    The recipe calls for whole oranges, which are boiled and then processed in a blender, unfortunately, the oranges I used were a bit pithy and left a slightly bitter flavor in the cake. For that reason, I would take the time to peel the zest and cut the pith away from the fruit before boiling it. Another slight change I made was to cook the remaining orange/sugar water down until it was beginning to be jammy. That made a wonderful glaze that remained on the top of the cake instead of disappearing into the cake.  

    Everyone here loved this cake's excellent taste and texture. The use of the almond meal was sheer brilliance as it adds a luscious texture and flavor to the cake. To add a professional finish to this cake I would add some candied orange tweels to the top.

    This would be a lovely cake for an afternoon tea or formal dinner dessert as you can bake it up to three days in advance, storing it in the refrigerator, or frozen for six months remembering to leave the glaze off until you are ready to serve it. 

    If you bake this cake let us know how it turns out, and go give Chloe, over at Baking Envy a review as well. 

    With warm wishes for your home, 
    from the husMait home kitchen.


    Gluten Free Gingerbread

    Gluten Free Gingerbread

    A family favorite traditional Gingerbread cookie recipe that I have been baking for close to 40 years, and have substituted gluten-free flour, plant-based milk, and plant-based butter. 

    We loved the crisp texture and ginger flavor these cookies delivered!

    Read more