Free shipping on orders of $35 or more
0 Cart
Added to Cart
    You have items in your cart
    You have 1 item in your cart
    Total
    Check Out Continue Shopping

    Articles and Recipes — vegetarian

    Cookies! Chinese New Year Traditions

    Cookies! Chinese New Year Traditions

    Just when you thought cookie season was over, I would like to introduce you to two traditional Chinese New Year Cookie recipes Hup Toh So and Almond Cookies.  

    Almond Cookies are created using traditional wooden molds, last year I demonstrated using husMait round cookie cutters and the bottom of husMait measuring cups. See that post here. The base of the 1/3 cup Stainless Steel Measuring Cup fits perfectly into the second smallest Stainless Steel Cookie Cutters and the 1/8 Stainless Steel Cup can be used in the smallest Stainless Steel Cookie Cutter.


    This year I was able to go to Shanghai Street, in Hong Kong to buy the traditional wooden molds, and I am returning to Helen Au’s A Step Full of You for her Vegan Chinese Almond Cake Biscuit recipe. I love the way the traditional molds shaped the cookies.


    Hup Toh So is a walnut cookie this year I am using a recipe from Daily Cooking Quest by Anita. If you are looking for a vegan version, I like this one from What To Cook Today, or simply replace the butter with vegan butter or vegetable shortening.


    Products used in baking these recipes: 

    Set of 3 Melamine Mixing Bowls
    Stainless Steel Cookie Cutters
    Stainless Steel Measuring Cups
    Stainless Steel Measuring Spoons
    Flour Scraper Set of 2
    Essential Bakeware 5 Piece Set
    Signature Bakeware 5 Piece Set

    Spring Rolls - Wishing You Wealth and Prosperity

    Spring Rolls - Wishing You Wealth and Prosperity

    Kung Hei Fat Choi! 🧧 Happy Lunar New Year!

    I have always loved Chinese food, and have been fortunate to live in Hong Kong where we enjoyed the traditions and all of the special food surrounding the Chinese New Year celebrations. This year Chinese New Year begins on February 1st. The first three days have important traditions of family gatherings and gift-giving, with some people celebrating with the culmination of the Lantern Festival on Feb 15, 2022. It is fun to learn the culture surrounding these traditions.

    Spring Rolls are a favorite dish, traditionally served on the first day of Chinese New Year, and year-round at yum cha/dim sum. Generally the shape and color remind us of gold bars, which are believed to bring wealth and prosperity to your home and business. I enjoyed reading Amanda Xi’s explanation of the culture surrounding the spring roll. There is a detailed comparison of the wide variety of fillings and sizes of spring rolls written by Cindy on China Highlights.  

    In the US the more commonly found variation is the larger egg roll, which we loved for years, and still enjoy. Spring roll wrappers are flexible in texture and self-seal, whereas egg roll wrappers are more like pasta dough, need an egg wash to seal the edges, and can hold filling that has more texture and volume. Over the years I have melded many recipes together for my fillings, and our family prefers the smaller spring roll size. Spring rolls can easily be made vegan by adding mushrooms and omitting the pork. Many recipes call for additional ingredients such as shrimp. 

    Sheri’s Spring Rolls 

    Equipment: 
    7” Santoku Knife with Sheath
    Set of 3 Stainless Steel Bowls (useful to cool hot food)
    Stainless Steel Measuring Spoons
    Stainless Steel measuring cups
    Silicone  Rolling Mat
    10x15” Non-Stick Baking Sheet
    Cutting board
    skillet
    spatula
    damp cloth to cover wrappers 

    Ingredients:
    1/2 pound ground pork (* vegetarian option noted below)
    2 garlic cloves, minced
    1/2 a medium head of cabbage, sliced thin and chopped
    1 carrot, grated
    4 ounces bamboo shoots, julienned 
    1/2 inch ginger root, minced finely
    2 teaspoons Shao Xing Rice Wine
    1 teaspoon Light Soy Sauce
    1/2 teaspoon five-spice powder
    Salt, white pepper
    2 green onions, sliced thin
    1 pack spring roll wrappers** 
    Up to 1/4 cup vegetable oil for frying.

    Method:

    Prepare all the vegetables. 

    In a skillet over medium heat lightly brown ground pork* and minced garlic. Remove into a heatproof bowl to cool. 

    In the same skillet, over medium heat, add 1 tablespoon vegetable oil, cabbage, carrots, bamboo shoots, and ginger then cook until the cabbage begins to soften. 

    Add rice wine, soy sauce, five-spice powder, and seasonings. Continue cooking until the cabbage is soft but not overcooked. 

    Add the vegetables to the pork, and mix well. Taste the mixture and adjust seasonings. 

    When cool set up your rolling station - filling, open wrappers covered with damp cloth, tablespoon,  


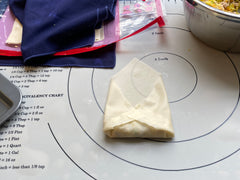
    Orient a wrapper on the work surface in a diamond, add 1 1/2 tablespoons of filling just below the middle of the wrapper, fold the lower triangle over the filling, then the left and right points over the filling. Taper the fold lines slightly so that the roll will look neat.

    Lay the rolled spring roll on a tray with the fold side down and continue until all the filling is wrapped.

    Heat the skillet over medium heat, add 1 Tablespoon, or just enough oil to coat 1/2 of the spring rolls. Brown on all sides. You can shallow fry or deep fry for a richer color. Repeat.

    Serve warm with soy sauce with chili oil, sweet and sour sauce, and or mustard sauce. 

    We hope you try this recipe, and tag us on social media!

    Sending warm wishes to your home, 
    from the husMait home kitchen. 


    *Vegetarian option: 1/2 pound of brown or Portobello mushrooms, plus a few rehydrated dry mushrooms. 

    **If you cannot find spring roll wrappers you can substitute Egg Roll wrappers.
    If you use egg roll wrappers you will need egg wash to seal the edges.

    Check out this source for lots of information on Chinese New Year.

    Thanksgiving Gravy Two Ways

    Thanksgiving Gravy Two Ways

    Thanksgiving is just a few short weeks away, and the husMait kitchen has been testing some vegan recipes. One of our favorites was Vegan, Gluten-Free Stuffing-Muffins with Mashed Potatoes and Gravy from Ilene Godofsky Moreno. Ilene made a miso gravy to go on top of hers, but I wanted a gravy that was closer to our pre-vegan turkey gravy. 

    Let's talk Gravy 101 first. Everything I know about gravy and sauces I learned from the Fannie Farmer Cookbook, by Marion Cunningham. Gravy and its sister Bechamel Sauce have some fundamentals that are easy to master. Begin with equal parts fat to flour, and cook this roux over medium heat, whisking constantly, for a minimum of 3 minutes and up to 15 minutes. Roux cooked for 3 minutes will lose its raw flour flavor, and will produce a pale gravy. The longer you cook the roux, the deeper the color becomes, and the more flavor develops. However, watch the roux carefully as it will burn. To the roux whisk in stock, milk, or cream. 

    Our first gravy is Fannie Farmer Basic Chicken or Turkey Gravy. The recipe calls for a ratio of 4 Tablespoons of pan dripping fat + 3 Tablespoons of flour + 2 cups of pan drippings liquid and stock which produces 2 cups of gravy. It was in this cookbook where I learned a foolproof way to have smooth gravy is to whisk in warm or hot liquid to the roux.

    With that knowledge let's talk about our second way - Vegan Onion Gravy. We want a rich, savory, brown gravy to go with our Stuffing Muffins. 

    Method: I started with thinly sliced onion, sautéed in 1 tablespoon of canola oil and a pinch of salt until it was just on the verge of caramelization. I knew I needed to cook the onions for a minimum of three more minutes so they would further caramelize during that time, and I did not want them to burn. Then I added Miyokos European Style Cultured Vegan Butter and all-purpose flour and let the roux cook for at least 3 minutes, but probably closer to 6 minutes until it was a lovely rich brown. Then I added 1 cup of warm Better than Boullion Seasoned Vegetable Base and seasonings. I continuously whisked this until the gravy thickened and became a rich golden brown. 

    Ingredients 

    • 1 small onion, sliced thin 
    • 1 tablespoon canola oil
    • 2 tablespoons Vegan Butter
    • 2 tablespoons flour you can sub 1-1 gluten-free flour
    • 1 to 1 1/2 cup vegetable broth
    • 1 sprig of fresh thyme 
    • black pepper
    • salt (taste before adding additional salt at the last step)
    Equipment 

    You could omit the onions and use another vegetable, such as mushrooms or carrots or celery to be browned at the start, to create a Jane version of this gravy.

    Finally a note on quantity this was more than enough for the Stuffing Muffin recipe above. You can certainly scale this recipe up or down depending on how many people you will be serving. A general rule of thumb is 1/4 to 1/2 cup of gravy per person. 

    Find a video tutorial and more images over on Instagram.

    As always thank you for stopping by and let me know if you try our recipes in the comments below and or by tagging us on Instagram.

    Sending warm wishes to your home, 
    from the husMait home kitchen. 

    Chocolate Mint Wafers - Gluten-free & Vegan Version

    Chocolate Mint Wafers - Gluten-free & Vegan Version

    Today I am adapting a traditional recipe from the Better Homes and Garden Cookbook, circa 1950, which I inherited from my mother-in-law. Many traditional recipes are adapted to become gluten-free & vegan easily.  

    A few things I look for when considering a recipe: Is there a 'rise' that will be affected? Is there a textural element that will be affected? Sometimes I can compensate for these changes by increasing raising agents such as baking powder, cream of tartar, or substituting aquafaba whip for egg whites. Also being aware of how each raising agent works is important, it may need to be added later, or mixed minimally. For texture, it may be adapted by adding a glutenous grain such as rice flour, xantham gum, or oat flour or molding pastry crusts rather than rolling them. 

    I have learned a few things from my recent experiences adapting traditional recipes. One is that vegan butter has a much lower melting temperature than butter. Vegan butter is almost liquid at room temperature, therefore, chilling the dough is a great solution for a too soft dough. The gluten-free dough also benefits from resting either in the refrigerator or at room temperature. The flax egg is a great substitute, so long as you do not mind the look of the flax meal in your bake.  

    This is my updated Gluten-free Vegan Chocolate - Mint Wafer recipe.

    Chocolate Wafer Ingredients 
    2/3 cups (5.3 oz) Vegan Butter
    1 cup sugar
    1 flax egg ***
    2 cups 1-1 Gluten-Free Flour 
    3/4 cup Cocoa Powder
    1 teaspoons baking powder
    1/2 teaspoon salt
    1 teaspoon baking soda
    1/4 cup soy or almond milk

    Mint Filling Ingredients
    1 cup sifted confectioner's sugar
    1/8 teaspoon peppermint extract
    1/2 cup Crisco shortening 
    Crushed candy canes

    Equipment 
    Stainless Steel Measuring Cups 
    Stainless Steel Measuring Spoons 
    Melamine Mixing Bowls or Stainless Steel Mixing Bowls 
    12" Silicone Whisk with Stainless Steel Handle
    OR 10” Silicone Whisk with Wooden Handle
    Silicone Rolling Pin
    Silicone Rolling Mat
    Silicone Flour Scraper
    Silicone Baking Mat
    10"x15" Non-Stick Baking Sheet

    Cooling rack  

    Method: 
    1) In a medium bowl measure and whisk thoroughly gluten-free flour, cocoa powder, baking powder, salt, and baking soda.

    2) In a large bowl cream the vegan butter and sugar. When fully creamed add the flax egg. Whip until light and fluffy. 

    3) Alternately add dry ingredients and vegan milk. Mixing well and scraping the bowl between additions. 

    4) Divide the dough into 4 and chill thoroughly. 

    Preheat oven to 350F

    5) Remove a quarter of the dough and roll to 1/8".  Cut into shapes. Repeat with the other quarters. Refrigerate the scraps that become too soft between rolling. 

    6) Bake for 8 - 10 minutes. Cool 

    7) Make the filling by beating together confectioners sugar, peppermint extract, and Crisco until spreading consistency.

    8) Spread a thin layer of frosting onto the bottom of a cookie, and top with another, finally roll in crushed candy canes. 

    Note:
     Double the filling ingredients if you like a lot of filling!
    ***1 Tablespoon flax meal + 3 Tablespoons warm water, stir and let stand 5 minutes

    If you would like more information on this recipe there is a process tutorial and more still photos of these cookies over on our Instagram page husMait_home 

    We would love to hear from you in the comments below if you try this or any of our recipes  

    Sending warm wishes to your home, 
    from the husMait home kitchen. 

    Sheri’s Granola Recipe

    Sheri’s Granola Recipe

    Homemade granola is simply nutritious and delicious. We appreciate that we control the sugar content. I use Quaker Oats because they are nut free and gluten free. If your family is nut free simply increase the variety and amount of seeds you add to the recipe. Example 1 cup of each seed, or add flax, hemp or sesame to the mix. 

    Our family likes homemade granola on plain yogurt with a spoon of homemade jam. Granola is also delicious with milk - almond or soy milks are great choices. We also like to add a handful of dried fruit for extra sweetness.

    Ingredients 
    5 cups of thick-cut rolled oats
    2 Tablespoons packed brown sugar
    ½ teaspoon ground cinnamon
    ¼ teaspoon kosher salt

    1/3 cup honey
    ¼ cup canola oil
    1 teaspoon vanilla extract

    ¾ cup pecans (you can used chopped nuts)
    ¾ cup almonds
    ½ cup pumpkin seeds
    ½ cup sunflower seeds

    Equipment
    Set of 3 Stainless Steel Bowls
    Stainless Steel Measuring Cups
    Stainless Steel Measuring Spoons
    Set of 2 Flour Scraper  
    10.5 x 15 nonstick baking pan
    Chopping board

    7” Santoku Knife with Sheath

    Method 

    Preheat oven to 300 F placing the rack in the middle, if possible add a second rack below. 

    Place the oats, brown sugar, cinnamon, and salt in a large bowl and mix well making sure to blend out any brown sugar lumps. 

    In a separate bowl mix the honey, canola oil, and vanilla extract well.

    Pour this over the oat mixture and stir well until the oats are thoroughly coated.
    Spread the mixture in an even layer on a rimmed baking sheet. See note

    Bake for 15 minutes, then stir and continue baking until the granola is very light golden brown; stirring every 5 minutes for about 15 to 20 minutes more.

    AT THE SAME TIME AS YOU BAKE THE GRANOLA
    Spread the pecans and almonds on a second baking sheet and place that on the lower rack in the oven for 10 minutes. Cool slightly and transfer to a cutting board.

    Put the pumpkin and sunflower seeds on the baking sheet and bake for 10 minutes.

    When the nuts are cool cut them into small pieces.

    When nicely browned remove the granola pan from the oven and mix the nuts and seeds into the baked oats.

    Cool completely and store in an airtight container.

    Notes
    After trying many baking trays I found a 10.5 x 15 nonstick baking pan is the best. The high sides help keep the oats contained while frequently stirring.

    Let us know in the comments if you try our recipe. 

    Sending warm wishes to your home, 
    from the husMait home kitchen. 

    Basic Balsamic Vinaigrette

    Basic Balsamic Vinaigrette

    Today I am sharing our favorite Balsamic Vinaigrette, which is my recipe adapted over the years. 

    This vinaigrette was based on a pasta salad dressing my mom used to make. You can make this in a mortar and pestle, or a blender, or on a chopping board. Check out our Instagram IGTV for a visual tutorial.

    I often make this on the cutting board since it is probably on the counter for a salad anyway. 

    Ingredients:
    1 clove of Garlic, peeled 
    1 handful of fresh Basil (1/8 to 1/4 cup)
    1 Tablespoon fresh Oregano 
    1 Tablespoon Capers 
    1/3 cup Balsamic Vinegar 
    1/3 cup water
    1 - 2 Teaspoons Dijon Mustard
    1/3 cup Olive Oil
    Pinch Salt
    1/2 teaspoon Pepper


    Equipment:
    Cutting Board
    Set of 3 Melamine Mixing Bowl
    12” Silicone Whisk With Stainless Steel Handle
    Side Tang Cooks Knife
    Stainless Steel Measuring Spoons
    Stainless Steel Measuring Cups

    Method: 

    1. Roughly mince the garlic on the cutting board
    2. Add 1/4-1/2 teaspoon of salt on top of the garlic. Using the flat of the knife crush and rub the garlic and salt into a paste. Place the paste into the mixing bowl.
    3. Chiffonade the basil and oregano together. Add the capers to them and chop these finely. Place them into the mixing bowl.
    4. To the mixing bowl add the vinegar, water, mustard, a pinch of salt, and pepper. Whisk well. 
    5. Add the oil and whisk very well, until the oil is fully emulsified. 
    6. Taste and adjust the seasonings - be mindful that you do not over-salt the dressing - you added salt with the garlic, the capers, and the mustard have salt, and you may be adding salty items to your salad like olives, feta cheese, or salami.
    7. Keep the dressing refrigerated in a jar. I use a 1/2 Pint Canning Jar with a leakproof lid.

    We hope you try our recipe. Let us know what you think in the comments. 


    Sending warm wishes to your home, 

    from the husMait home kitchen.